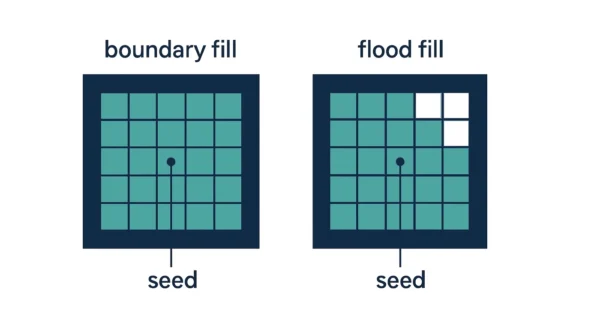
Flood fill vs boundary fill comes down to what each one checks. Boundary fill paints outward from a seed pixel until it hits a boundary colour. So it can fill a region whose interior has several different colours. Flood fill instead paints every pixel that matches one old interior colour. It needs a uniform interior, but it does not care what colour the border is. Both spread from a seed pixel. Both can leak, too: a gap in the boundary, or a stray patch of the old colour, breaks the assumption each one relies on. Neither is faster in general, since both visit each pixel in the region once.
Paint a closed shape on screen, and something still has to decide which pixels inside it change colour. That job belongs to a seed fill algorithm. Computer graphics gives you two classic ones to learn.
Flood fill and boundary fill look almost identical in pseudocode. Yet GATE papers and viva questions turn on one small difference between them. This guide walks through both, then runs the same 7 by 7 grid through each. You can see, pixel by pixel, where they part ways.
Filling sits downstream of the pipeline that draws a shape’s outline. A stack-based fill is depth-first, and a queue-based fill is breadth-first, an idea that returns later in this guide. See DFS vs BFS first if that distinction is new to you.
What Seed Fill Algorithms Do
Area filling starts from one known pixel inside a shape, called the seed. From there, the algorithm spreads outward, pixel by pixel. At each step, it decides whether to paint the next neighbour.
Both algorithms here are seed fill algorithms for that reason. Each begins at a seed. Each keeps visiting neighbours until no unpainted neighbour is left. The spreading itself, up, down, left, right, and sometimes diagonally, is identical between them.
What differs is the stopping rule. Boundary fill watches for a border colour. Flood fill instead watches for the colour it is replacing. That single change is the entire subject of this article, and the worked example below makes it concrete.
The Boundary Fill Algorithm
Boundary fill starts at a seed pixel and spreads outward. It stops only when it meets a specified boundary colour. Everything inside that border gets painted, no matter how many colours the interior already contains.
The condition is simple. If the current pixel’s colour is neither the boundary colour nor the fill colour, paint it, then recurse into its neighbours. The check only ever looks for the boundary colour. So a stray patch of a third colour inside the region gets painted over too. That is the algorithm’s defining strength, not a limitation.
Here is the pseudocode:
def boundary_fill(x, y, fill, boundary):
    if get_pixel(x, y) != boundary and get_pixel(x, y) != fill:
        set_pixel(x, y, fill)
        boundary_fill(x + 1, y, fill, boundary)
        boundary_fill(x - 1, y, fill, boundary)
        boundary_fill(x, y + 1, fill, boundary)
        boundary_fill(x, y - 1, fill, boundary)
The call takes four parameters: x, y, the fill colour, and the boundary colour. Notice that interior colour never appears in the call at all.
Advantages of boundary fill:
- Handles a multi-coloured interior without any extra logic, since it never checks interior colour at all.
- Works well for shapes built from several smaller regions merged visually into one outline.
- Simple to state: paint until you hit the border.
Disadvantages of boundary fill:
- Needs the region’s border drawn in one single uniform colour, or the stopping rule breaks.
- Leaks outside the shape if the boundary has even a one-pixel gap.
- The classic recursive version can overflow the call stack on a large region.
The Flood Fill Algorithm
Flood fill starts at a seed pixel too. Its stopping rule, though, looks the other way. It replaces every connected pixel that matches one old interior colour with the fill colour. It stops wherever that old colour stops.
The condition mirrors boundary fill’s. If the current pixel’s colour equals the old colour, paint it, then recurse into its neighbours. So flood fill needs the interior to be uniformly one colour before it starts. Any pixel of a different colour inside is left untouched, since it never matches the old colour being replaced.
Here is the pseudocode:
def flood_fill(x, y, fill, old):
    if get_pixel(x, y) == old:
        set_pixel(x, y, fill)
        flood_fill(x + 1, y, fill, old)
        flood_fill(x - 1, y, fill, old)
        flood_fill(x, y + 1, fill, old)
        flood_fill(x, y - 1, fill, old)
The call also takes four parameters: x, y, the fill colour, and the old colour. Flood fill never inspects the border. So the border may be several different colours at once, and the algorithm will not notice.
Advantages of flood fill:
- Places no requirement on the boundary colour, so an outline drawn in mixed colours still works.
- Matches exactly what a paint bucket tool in an image editor needs to do.
- Simple to state: paint every pixel that still matches the old colour.
Disadvantages of flood fill:
- Needs a uniform interior colour, so any patterned or shaded region confuses it.
- An odd-coloured pixel inside the region survives the fill untouched, which is not always what you want.
- The classic recursive version, like boundary fill’s, can overflow the call stack on a large region.
Flood Fill vs Boundary Fill: Comparison Table
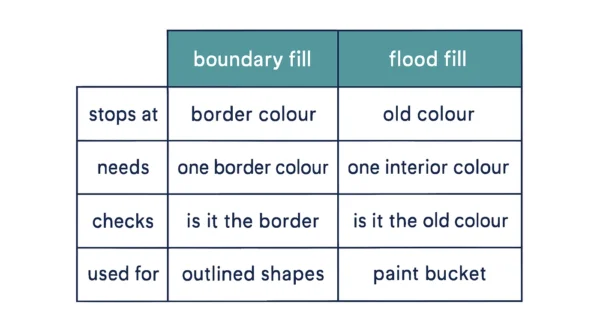
| Aspect | Boundary Fill | Flood Fill |
|---|---|---|
| Stopping condition | Reaches the specified boundary colour | Reaches a pixel that is not the old colour |
| Per-pixel check | Colour is not the boundary and not the fill colour | Colour equals the old colour |
| What defines the region | The border colour, drawn around the shape | The interior colour, filled inside the shape |
| Interior colour requirement | None; the interior may hold several colours | Must be uniformly one colour throughout |
| Boundary colour requirement | Must be one uniform colour | None; the border may be several colours |
| Parameters passed | x, y, fill colour, boundary colour | x, y, fill colour, old colour |
| Behaviour toward an odd-coloured interior pixel | Paints over it, since it is not the boundary colour | Leaves it untouched, since it is not the old colour |
| How it fails or leaks | Leaks out through any gap in the boundary | Leaks wherever the old colour continues outside the shape; under-fills if an off-colour patch splits the region |
| Connectivity variants | 4-connected or 8-connected | 4-connected or 8-connected |
| Recursion depth and memory | One call per pixel; risks stack overflow on large regions | One call per pixel; risks stack overflow on large regions |
| Suitability for patterned or shaded interiors | Well suited, since interior colour is never checked | Poorly suited, since it expects one uniform colour |
| Seed pixel outside the region | Fills the surrounding area instead, up to the nearest boundary colour | Fills whatever region shares the seed’s own colour |
| Typical use case | Shapes assembled from several merged sub-regions | An image editor’s paint bucket tool |
| Time complexity | O(n) in the number of pixels in the filled area | O(n) in the number of pixels in the filled area |
Worked Example: The Same Seed, Two Results
Take this 7 by 7 grid. The # marks the boundary colour. The . marks the interior colour. Two stray o pixels sit inside the region in a third colour. The seed is at column 3, row 3, right in the centre.
#######
#.....#
#..o..#
#.....#
#..o..#
#.....#
#######
Run boundary fill from the seed with fill colour * and boundary colour #. The check only looks for #. So both o pixels get painted along with everything else:
#######
#*****#
#*****#
#*****#
#*****#
#*****#
#######
Run flood fill from the same seed with fill colour * and old colour .. This time the check looks for .. The o pixels never match, so they survive untouched:
#######
#*****#
#**o**#
#*****#
#**o**#
#*****#
#######
Same grid, same seed, same fill colour. Yet the two results differ by exactly two pixels. Boundary fill swallows the odd pixels, because it never checks interior colour. Flood fill leaves them behind, because they fail its one and only test. Keep this picture in mind. It explains almost every other row in the comparison table above.
4-Connected vs 8-Connected Filling
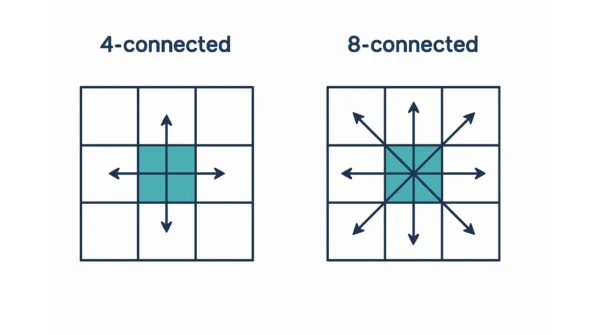
Both algorithms come in two connectivity variants. The choice is independent of which fill you use. A 4-connected fill visits up, down, left, and right. An 8-connected fill visits those four plus the four diagonals.
A 4-connected fill never moves diagonally. So it cannot pass through an opening that only touches at a corner. A thin diagonal sliver of the region can be left unfilled as a result. An 8-connected fill has no such gap, since it steps through corners too.
That extra reach cuts both ways, though. An 8-connected fill can leak through a diagonal gap that a 4-connected fill would have respected. Neither variant is universally better. The right choice depends on how the shape and its boundary were drawn.
Code Example
Below is a working Python version of both algorithms. Recursion is easy to write but risky on large regions. So both versions here use an explicit stack instead. That turns either one into an iterative, depth-first walk; see stack vs queue data structures for why a stack gives depth-first order, while a queue would give breadth-first order instead.
def boundary_fill(grid, x, y, fill, boundary):
    grid = [row[:] for row in grid]
    stack = [(x, y)]
    while stack:
        cx, cy = stack.pop()
        if grid[cy][cx] != boundary and grid[cy][cx] != fill:
            grid[cy][cx] = fill
            stack.extend([(cx + 1, cy), (cx - 1, cy),
                           (cx, cy + 1), (cx, cy - 1)])
    return grid


def flood_fill(grid, x, y, fill, old):
    grid = [row[:] for row in grid]
    stack = [(x, y)]
    while stack:
        cx, cy = stack.pop()
        if grid[cy][cx] == old:
            grid[cy][cx] = fill
            stack.extend([(cx + 1, cy), (cx - 1, cy),
                           (cx, cy + 1), (cx, cy - 1)])
    return grid


start = [
    list("#######"),
    list("#.....#"),
    list("#..o..#"),
    list("#.....#"),
    list("#..o..#"),
    list("#.....#"),
    list("#######"),
]

bf = boundary_fill(start, 3, 3, "*", "#")
ff = flood_fill(start, 3, 3, "*", ".")

print("Boundary fill result:")
for row in bf:
    print("".join(row))

print("\nFlood fill result:")
for row in ff:
    print("".join(row))

# Boundary fill result:
# #######
# #*****#
# #*****#
# #*****#
# #*****#
# #*****#
# #######
#
# Flood fill result:
# #######
# #*****#
# #**o**#
# #*****#
# #**o**#
# #*****#
# #######
Run this, and the two grids match the worked example exactly. Notice that boundary_fill checks for boundary, while flood_fill checks for old. That one line is the entire difference between the two functions.
When to Use Which
Use boundary fill when the outline is drawn in one consistent colour, but the interior might already hold other colours, such as text, icons, or overlapping sub-shapes. It also suits shapes assembled from several regions merged under one visible border.
Use flood fill when the interior starts out uniformly coloured, and you simply want to swap that colour for another. That is exactly the paint bucket tool in an image editor. It is why flood fill, not boundary fill, sits behind that feature almost everywhere. Filling only matters once a shape sits correctly on screen; see geometric transformation vs coordinate transformation for how it gets there first.
If neither assumption holds cleanly, patterned interior and patchy boundary both, plan on extra logic beyond either textbook version.
Interview Questions
Frequently Asked Questions
Wrapping Up
Flood fill and boundary fill both spread paint outward from a seed pixel. Their pseudocode differs by one condition. Boundary fill checks for the boundary colour, so it can cross a multi-coloured interior freely. Flood fill checks for the old interior colour instead, so it needs a uniform interior but never looks at the border at all.
Keep the worked grid in mind for your exam. The two stray pixels got painted under boundary fill and survived under flood fill. That single picture is the whole comparison in miniature. Both come in 4-connected and 8-connected variants. Both are O(n). An iterative stack keeps either one safe from a stack overflow on a large region.
Related reading on DiffStudy:
- DFS vs BFS: Understanding Key Differences
- Stack vs Queue Data Structures
- Windowing vs Clipping in Computer Graphics
- Viewport vs Window in Computer Graphics
- CS Fundamentals hub