
Windowing vs Clipping in computer graphics names two separate jobs. A window is a rectangular region chosen in world coordinates, not on a screen. So it marks which part of a scene deserves display. Windowing is the act of choosing that region. It then maps the chosen region onto a viewport. A viewport is the area on the actual display where that content lands. So a window says what to show, and a viewport says where it lands. Neither one is an operating-system window, a mix-up that trips up many beginners. Clipping, though, is a separate job entirely. It discards the parts of every point, line, polygon, curve, and text string that fall outside the window. Five types handle those five kinds of primitives: point, line, polygon, curve, and text clipping. Windowing still decides which area matters. Clipping enforces that decision, primitive by primitive. Together, the two turn a whole scene into exactly the picture a viewport should display.
Windowing vs Clipping in computer graphics names two steps that decide what actually reaches the screen. Ivan Sutherland’s early clipping work in the 1960s still shapes how renderers solve this same problem today.
Students often blur the two together, since both control what gets shown. Still, they solve different problems. Windowing chooses a region. Clipping removes geometry outside it. That single distinction changes what each one does to a scene.
Both steps run early in the pipeline, well before a scene reaches shading or final pixel output. Get windowing and clipping right, and everything built on top of them behaves correctly too.
What Is a Window in Computer Graphics?
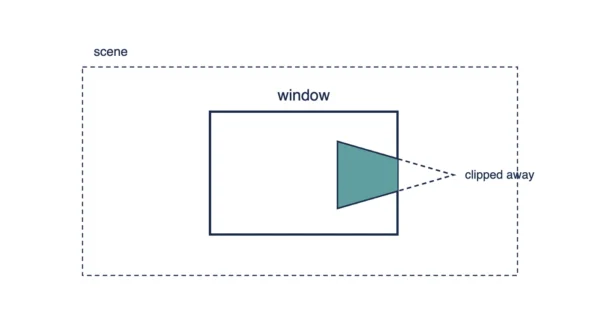
A window in computer graphics is a rectangular region defined in world coordinates. World coordinates describe the scene itself, before any mapping to a screen. So a window marks which part of that scene counts as worth displaying.
Two corners are usually enough to define one, since a rectangle needs no more than that. A window running from (xwmin, ywmin) to (xwmax, ywmax) covers every point whose x falls between those two x-values, and whose y falls between those two y-values. So nothing about a window depends on pixels or devices. A single scene can also carry more than one window at once. Each one frames a different region, for its own separate purpose.
This is where beginners often stumble, since the two ideas sound alike. A graphics window is not an operating-system window, the resizable box a browser or editor opens on a desktop. Instead, an OS window is a device-level container. A graphics window instead lives entirely inside world coordinates, long before a scene reaches any screen.
A window is also not a viewport, though the two work as a pair. The window says what to show, in world coordinates. The viewport, meanwhile, says where that content lands, in device coordinates on the actual display. For the full mapping between the two, see viewport vs window in computer graphics.
What Is Windowing?
Windowing is the process of choosing a window, then mapping its contents onto a viewport. So it selects the specific part of a scene worth rendering. It also routes that selection toward the display.
Still, a window works like a frame the viewer looks through. So only content inside that frame moves on to the next pipeline stage. Everything outside stays out of scope, at least until the window moves or resizes.
This selection step matters most, particularly in crowded or oversized scenes. A CAD drawing might hold thousands of components, but a designer usually needs only one section. So windowing narrows that flood down to a single, manageable slice.
Because a window sits in world coordinates, the same scene can be viewed through many different windows. Each one still picks a different region, at a different scale, without touching the underlying scene data. That flexibility is what makes windowing so useful for zooming, panning, and focused inspection. A CAD viewer, for example, can zoom into one bolt without ever touching the file behind it.
What Is Clipping?
Clipping is the process of discarding the parts of a scene that fall outside the window boundary. So only the geometry left inside that boundary moves forward for processing and drawing.
Every primitive gets tested against the window edges, including points, lines, polygons, curves, and text. Anything entirely outside gets dropped early, well before the renderer spends any real effort on it. Anything straddling the boundary, though, gets trimmed down to just its visible portion.
Clipping exists for efficiency and correctness together. So processing geometry the viewer will never see wastes cycles for nothing. Leaving it unclipped can also break the picture outright. A shape left half outside a window can leak into space meant for neighbouring content.
Clipped geometry still has to reach the screen as pixels afterward. That handoff runs through scan conversion, the process compared for straight and stepped output in raster scan vs random scan. Clipping decides what survives. Scan conversion decides how the surviving shape becomes actual pixels. Skip clipping first. Scan conversion would then waste effort turning invisible geometry into pixels nobody ever sees.
Windowing vs Clipping: Key Differences
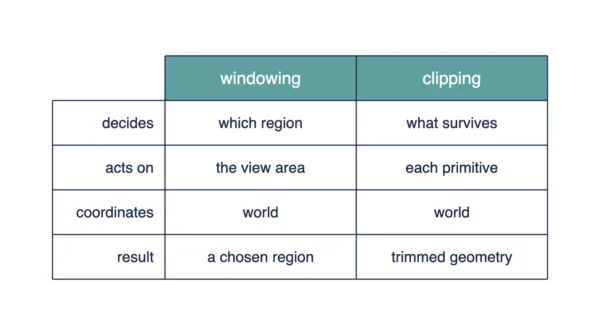
Windowing and clipping share a goal, though not a method. The table below lines up how each one behaves, from coordinates through to failure modes.
| Windowing | Clipping |
|---|---|
| Defines a visible portion of the scene | Removes invisible or non-visible elements |
| Focuses on controlling the display area | Optimizes rendering performance |
| Enhances visual clarity and detail | Eliminates hidden surfaces and unnecessary computations |
| Enables focused visualization | Enhances realism and efficiency in virtual environments |
| Used in user interfaces, gaming, and virtual reality | Applied in rendering, virtual reality, and image processing |
| Allows for the display of multiple windows | Ensures proper alignment of virtual objects |
| Optimizes user experience | Improves rendering performance and efficiency |
| May require additional computational resources | Challenges in determining accurate clipping regions |
| Improper windowing may exclude important details | Improper clipping may result in visible artifacts or missing details |
| Complex scenes can present challenges in defining effective windows | Requires consideration of occlusion and object visibility |
| Operates in world coordinates, ahead of projection | Operates against that same window boundary, primitive by primitive |
| Defines a rectangular region and a target viewport | Acts on points, lines, polygons, curves, and text |
| Has no named sub-algorithms of its own | Uses named algorithms: Cohen-Sutherland, Liang-Barsky, Cyrus-Beck, Sutherland-Hodgman, Weiler-Atherton |
| Answers what part of the scene matters | Answers which parts of each shape survive |
| Its paired concept is the viewport | Its paired concept is the window boundary itself |
Despite those differences, windowing and clipping share one goal: getting the right image onto the screen, without wasted or missing detail. Neither one replaces the other, since each solves half of the same problem.
The Five Types of Clipping
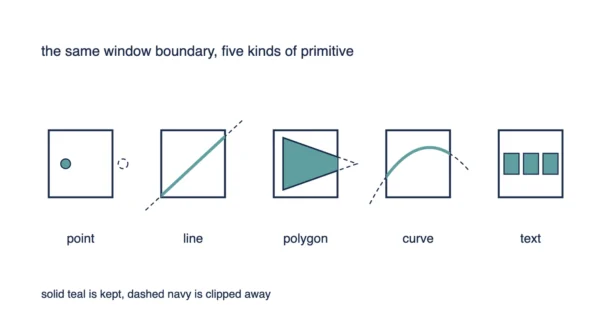
So clipping is not just one single operation. It splits into five types, one for each kind of primitive a renderer has to handle.
Point Clipping
So point clipping is the simplest case. A point survives only when it sits inside the window on both axes at once. If either coordinate falls outside the boundary, the point gets discarded entirely. This same in-or-out test also underlies every other clipping type, applied one coordinate at a time.
Line Clipping
Line clipping trims a segment down to the part that falls inside the window. A fully-inside line survives untouched, and a fully-outside line gets dropped. One crossing the boundary, though, gets cut at the edge, keeping only its visible half.
Three named algorithms handle this job: Cohen-Sutherland, Liang-Barsky, and Cyrus-Beck. Each still finds the same visible segment through a different method. So choosing between them usually comes down to how many lines a scene needs clipped at once. For a full comparison of the two most common ones, see Cohen-Sutherland vs Liang-Barsky. Whatever segment survives still needs drawing pixel by pixel, the step compared in DDA vs Bresenham line drawing.
Polygon Clipping
Polygon clipping trims a filled area rather than a single line. The result has to stay closed, since an open polygon cannot be filled correctly afterward. So games and CAD tools both lean on polygon clipping constantly. Most on-screen geometry ends up as filled shapes, rather than bare lines.
Sutherland-Hodgman and Weiler-Atherton are the two named algorithms here. Sutherland-Hodgman clips a polygon against one window edge at a time, in sequence. Weiler-Atherton instead handles concave polygons and holes, cases Sutherland-Hodgman was never built to manage.
Curve Clipping
Curve clipping applies the same idea to curved primitives, such as circles or splines, rather than straight edges. So testing every point along a smooth curve is expensive.
Renderers often shortcut that cost with a bounding box instead. If a curve’s bounding box sits entirely inside the window, the curve needs no further testing. If the box lies entirely outside, the curve gets dropped early. So only a curve whose box straddles the boundary needs the full, detailed pass. Fonts, vector illustrations, and CAD outlines all rely on this same bounding-box shortcut before committing to exact curve math.
Text Clipping
Text clipping decides what happens when a string of characters meets a window edge. So three strategies exist, at three different levels of precision.
All-or-none string clipping keeps a whole string only if it fits entirely inside the window; otherwise the renderer drops it. All-or-none character clipping instead makes that same decision per character, keeping each whole letter that fits. Individual character clipping goes further still, clipping a character’s own outline once it straddles the boundary. Editors handling live captions or subtitles often pick individual character clipping, since a half-visible line still needs to read correctly.
Worked Example: Point Clipping and the Window-to-Viewport Map
So numbers make point clipping easy to check. A point (x, y) survives clipping only when it satisfies two conditions at once:
xwmin ≤ x ≤ xwmax and ywmin ≤ y ≤ ywmax
Take a window running from (0, 0) to (100, 100), then test three points against it.
| Point | Test | Result |
|---|---|---|
| (50, 50) | Inside on both axes | Keep |
| (120, 50) | x exceeds 100 | Discard |
| (−5, 20) | x falls below 0 | Discard |
So surviving a clip test is only half the job. Every surviving point still needs mapping onto a viewport before it reaches a screen. Take that same window, from (0, 0) to (100, 100), and map it onto a viewport running from (0, 0) to (400, 300).
Two scale factors handle the mapping, one per axis:
sx = (400 − 0) / (100 − 0) = 4
sy = (300 − 0) / (100 − 0) = 3
Each mapped coordinate then follows a simple formula:
xv = xvmin + (xw − xwmin) · sx
yv = yvmin + (yw − ywmin) · sy
Take the point (50, 50) through that formula. xv = 0 + (50 − 0) · 4 = 200. And yv = 0 + (50 − 0) · 3 = 150. So (50, 50) lands at (200, 150) on the viewport.
| World point | Maps to |
|---|---|
| (50, 50) | (200, 150) |
| (25, 80) | (100, 240) |
| (100, 100) | (400, 300) |
This same mapping is the transformation behind every window-to-viewport step in a rendering pipeline. It gets covered in full detail in viewports and viewing transformations in computer graphics. Change either the window or the viewport size, and every scale factor above still updates accordingly.
Applications and Use Cases
Windowing and clipping both show up across real graphics systems, though usually for different reasons.
Windowing Applications
So it finds extensive use across several domains.
User Interfaces
Graphical user interfaces rely on windowing to display multiple windows at once, each holding its own application content. So this lets a user work across several programs at the same time. A word processor and a browser can then share the same screen without either one losing focus.
Gaming and Virtual Reality
Games and virtual-reality systems use windowing to define a field of view. This renders only the portion of a scene visible from that viewpoint, keeping performance steady while still delivering a seamless experience. A racing game, for instance, only renders the track ahead. It never renders the track already left behind.
Visualization and Data Analysis
Scientific visualization and data analysis both depend on windowing to isolate one region of a large dataset. Analysts can then explore that specific slice, instead of the entire dataset at once. So a billion-row log file becomes manageable, once windowing narrows it down to one afternoon’s traffic.
Clipping Applications
It also finds extensive use, across a parallel set of domains.
Rendering and Graphics Pipeline
Clipping is a core stage inside the rendering pipeline. It removes geometry outside the view before the pipeline reaches hidden-surface removal, a stage compared in z-buffer vs painter’s algorithm. Skipping this stage would still leave the renderer shading geometry nobody will ever actually see.
Virtual and Augmented Reality
Virtual and augmented-reality applications lean on clipping to keep virtual objects aligned with the real-world view. So trimming away occluded or out-of-frame content keeps the illusion intact. A virtual chair clipped correctly behind a real table looks anchored, rather than floating in front of it.
Image and Video Processing
Image and video processing use clipping to strip unwanted portions or outliers from a frame. So editors and post-processing tools rely on this step to sharpen a final result. A shaky phone video often needs its edges clipped away before the steadier centre feels usable.
Pros and Cons
Every technique still carries tradeoffs, and windowing and clipping are no exception.
Windowing: Pros and Cons
Pros:
- Enhances visual clarity and detail
- Enables focused visualization
- Improves user experience
Cons:
- May require additional computational resources
- Complex scenes can present challenges in defining effective windows
- Inappropriate windowing may result in important details being excluded from the viewport
Clipping: Pros and Cons
Pros:
- Optimizes rendering performance
- Eliminates hidden surfaces and unnecessary computations
- Enhances realism and efficiency in virtual environments
Cons:
- Complex scenes can present challenges in determining accurate clipping regions
- Improper clipping may result in visible artifacts or missing details
- Requires careful consideration of occlusion and object visibility
How They Work Together
Windowing and clipping are not competitors. They are two steps in the same job, run one after the other.
Windowing comes first in the sequence. It picks the world-coordinate region a scene should show, then points that region toward a viewport. So nothing gets removed yet at this stage.
Clipping runs next, against the exact region windowing just defined. So it walks through every point, line, polygon, curve, and text string, keeping what falls inside and discarding the rest.
Skip either step and the pipeline still breaks, just in a different way. Without windowing, no test boundary exists in the first place. Without clipping, geometry outside the window still gets processed, wasting cycles or corrupting the final image. Most rendering pipelines therefore run both steps on every single frame.
Frequently Asked Questions
Wrapping Up
Windowing vs Clipping in computer graphics is not really a rivalry. Each one still solves a different half of the same problem: what to show, and what to remove.
Windowing picks the region worth showing, defined in world coordinates and mapped onto a viewport. Clipping then walks through every point, line, polygon, curve, and text string, keeping only what survives inside that region.
Keep the five clipping types close for exams and interviews alike: point, line, polygon, curve, and text clipping. Keep the window-versus-viewport distinction closest in mind, since that mix-up trips up beginners more than any other.
Related reading on DiffStudy:
- Viewport vs Window in Computer Graphics
- Cohen-Sutherland vs Liang-Barsky
- Z-Buffer vs Painter’s Algorithm
- Gouraud vs Phong Shading
- CS Fundamentals hub
Thank you so much for your kind words! I’m thrilled to hear that you found my content original and refreshing. Your encouragement means a lot and motivates me to keep sharing unique perspectives. Many thanks!
Thank you so much for your kind words! I’m thrilled to hear that you found my content original and refreshing.