Viewports and viewing transformations work together to put a scene on screen. A window is a rectangle chosen in world coordinates that picks what part of the scene to show. A viewport is a rectangle on the display device that decides where it appears. The viewing transformation maps the window onto the viewport, so the chosen slice of the world lands in the right spot on screen. In short, the window selects, the viewport places, and the transformation does the mapping in between.
In computer graphics, viewports and viewing transformations control how a scene appears on the screen. Viewing transformations map objects from world space onto a 2D plane, while viewports define the visible portion of the rendered scene. So this guide explores their roles, the differences between them, and their importance in graphical rendering.
The core idea is a simple pipeline. You pick a region of the world to show, then you map that region onto a region of the screen. Because that mapping must keep shapes in proportion, it relies on a small piece of mapping math. This article walks through that pipeline step by step, then shows the exact equations with a worked example.
If you want the pure head-to-head contrast instead, see our dedicated guide on viewport vs window in computer graphics. For the cropping side of the story, our post on windowing vs clipping covers how parts outside the window are removed.

Understanding Viewports
Viewports are like windows on your computer screen. Indeed, they show you only part of a picture, much like a frame around a painting. So they help control how pictures look on your screen, and they decide exactly where the image sits on the display.
To be precise, a viewport is a rectangular region defined in device coordinates, meaning the actual pixels of the screen. Because the viewport fixes the on-screen location and size, two different viewports can show the same scene in two different corners of one display.
What Viewports Do
Viewports also help decide how pictures are shown on your screen. So they make sure everything looks just right when you are viewing images on a computer or a phone. In effect, the viewport is the destination rectangle, and the rendered scene is squeezed or stretched to fit inside it.
Different Types of Viewports
There are many kinds of viewports, and different types serve different purposes. Some stay the same fixed size, while others can change size as the layout changes.
- Fixed viewports keep one constant size and position, so they suit a stable on-screen panel.
- Resizable viewports grow or shrink with the window, so the content reflows as the user drags an edge.
- Multiple viewports split one screen into several views, for example a CAD tool showing top, front, and side at once.
How to Manage Viewports
People use a few different tricks to handle viewports well. These tricks make sure pictures look good and behave smoothly on screen.
Advantages of using viewports:
- Precise placement, since the viewport pins the image to an exact screen region.
- Multiple views at once, because several viewports can share one display.
- Device independence, as the same scene maps cleanly to large or small screens.
Disadvantages to watch for:
- Distortion, if the viewport aspect ratio does not match the window.
- Extra bookkeeping, because each viewport needs its own mapping.
- Wasted effort, since content outside the viewport still has to be clipped away.
Understanding Viewing Transformations
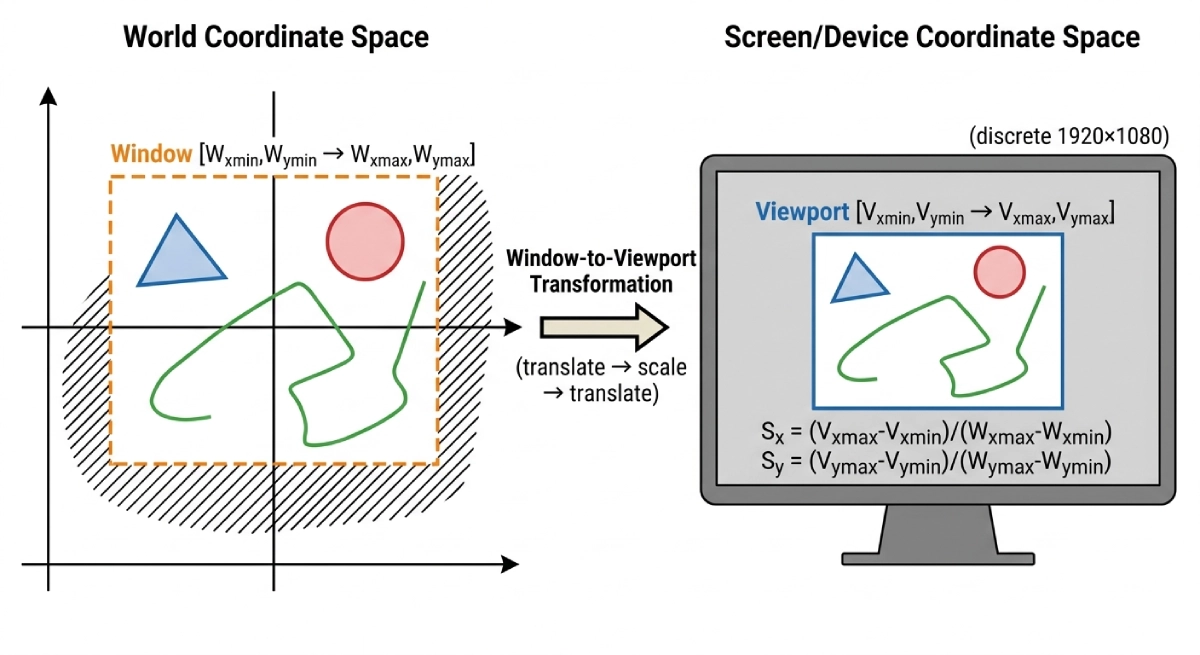
Viewing transformations are like magic tools for moving around a digital scene. So they help you see things from different angles, which makes them super useful for exploring virtual places. In 2D graphics, the key one is the window-to-viewport transformation, also called the windowing transformation.
This transformation maps every point inside the window, given in world coordinates, to the matching point inside the viewport, given in device coordinates. Because the window and the viewport can differ in size, the mapping scales the image to fit. As a result, the chosen slice of the world appears correctly placed on the screen.
What 3D Transformations Do
With 3D transformations, you can move objects around inside a digital world. For example, you can make them bigger, smaller, or turn them around, like playing with digital toys. So translation, scaling, and rotation reposition objects before the scene is ever projected to a flat image.
About Camera Transformations
Camera transformations, meanwhile, help decide how you see things in a digital world. They control where you are looking from and how the scene looks from that viewpoint. In other words, the camera transform sets the viewpoint, and the rest of the pipeline flows from there.
What Perspective Projection Does
Perspective projection is the step that makes things look real in digital pictures. It makes distant objects appear smaller and near objects appear larger, just like in real life. So perspective projection adds the depth cue that flat, parallel projection cannot.
The 2D Viewing Pipeline
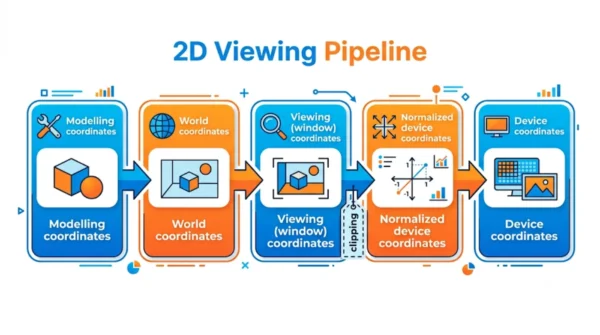
The viewing transformation is really one stage in a larger chain. So a point travels through several coordinate systems before it ever lights a pixel.
- Modelling coordinates describe each object in its own local space.
- World coordinates place every object together in one shared scene.
- Viewing coordinates apply the window, that is the rectangle that selects what to show.
- Normalized device coordinates (NDC) rescale the view into a standard unit range for portability.
- Device coordinates finally map onto the viewport in actual screen pixels.
Clipping fits neatly into this chain. Because anything outside the window should never reach the screen, the clipper removes those parts before the device-coordinate step. As a result, only the selected region survives to be drawn.
Window vs Viewport: Comparison Table
The window and the viewport are easy to confuse, yet they sit at opposite ends of the mapping. So this table lines up the key differences side by side.
| Aspect | Window | Viewport |
|---|---|---|
| Definition | Region selected in the scene | Region on the display device |
| Coordinate system | World coordinates | Device (screen) coordinates |
| Purpose | Chooses what to show | Chooses where it appears |
| Shape | Rectangular area | Rectangular area |
| Bounds | xwmin, xwmax, ywmin, ywmax | xvmin, xvmax, yvmin, yvmax |
| Set by | The scene designer | The display layout |
| Maps | The source of the mapping | The destination of the mapping |
| Clipping | Clips the scene to its edges | Receives only the clipped content |
| Resizing effect | Changes how much scene is shown | Changes how large it looks on screen |
| Multiple instances | One window per view | Many viewports can share a screen |
| Units | World units (problem space) | Pixels |
| Aspect ratio role | Sets the source proportion | Must match it to avoid distortion |
| Pipeline stage | Viewing coordinates | Device coordinates |
| Transformation | Input to window-to-viewport map | Output of window-to-viewport map |
| Analogy | A frame cropping a painting | A frame hanging on the wall |
Window-to-Viewport Mapping Math
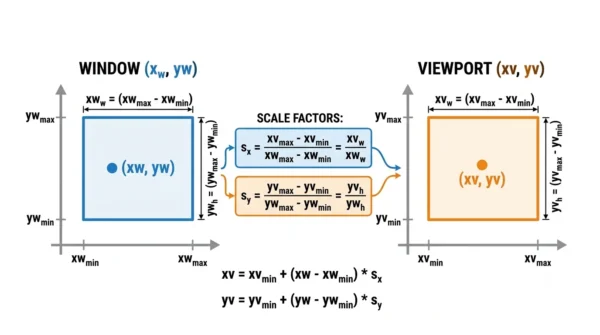
The mapping itself is short, so the math is friendly. First the transformation finds two scale factors, one for each axis. Then it uses those factors to place every point.
The scale factors compare the viewport size to the window size:
sx = (xvmax - xvmin) / (xwmax - xwmin)
sy = (yvmax - yvmin) / (ywmax - ywmin)
Next the transformation maps any window point (xw, yw) to its viewport point (xv, yv):
xv = xvmin + (xw - xwmin) * sx
yv = yvmin + (yw - ywmin) * sy
The logic is intuitive. That is, you measure how far the point sits from the window corner, you scale that distance, and then you add it to the viewport corner. So relative position is preserved, which keeps the image proportional.
One caveat matters for exams. When sx equals sy, the image keeps its shape. However, when sx differs from sy, the image is stretched or squashed, because the two axes scale by different amounts. So matching the aspect ratios avoids distortion.
A Worked Example
Numbers make the mapping concrete, so let us run one point through it. Suppose the window spans from (0, 0) to (10, 10) in world coordinates. Meanwhile, the viewport spans from (0, 0) to (200, 100) in device pixels.
First compute the scale factors. Here sx = (200 - 0) / (10 - 0) = 20, while sy = (100 - 0) / (10 - 0) = 10. Because sx and sy differ, this mapping will stretch the image horizontally.
Now map the window point (5, 5), which sits at the centre. So xv = 0 + (5 - 0) * 20 = 100, and yv = 0 + (5 - 0) * 10 = 50. The centre of the window lands at pixel (100, 50), which is exactly the centre of the viewport. In short, the relative position carried over perfectly, even though the shape was scaled unevenly.
Interview Questions
Frequently Asked Questions
Wrapping Up
Viewports and viewing transformations turn a chosen slice of a scene into pixels on screen. The window selects the region, the viewport sets the destination, and the viewing transformation maps one onto the other.
Remember the simple rule: window in world coordinates, viewport in device coordinates, and scale factors in between. Because the mapping preserves relative position, the image stays proportional whenever sx equals sy. So once you can run a point through that pipeline, most exam and interview questions on the topic fall into place.
Related reading on DiffStudy:
- Viewport vs Window in Computer Graphics
- Windowing vs Clipping in Computer Graphics
- CS Fundamentals hub

You are so awesome! I don’t suppose I have read a single thing like this before.
So wonderful to discover someone with some original thoughts
on this subject matter. Seriously.. many thanks for starting this
up. This site is something that’s needed on the internet, someone with a
bit of originality!
Thanks
This is a fantastic exploration of viewports and viewing transformations! Your explanations on how viewing transformations work, from model space to screen space, are clear and concise.
Thank you so much for your kind words! I’m thrilled you found the explanations clear and concise. If you have any more questions or need further clarification, feel free to reach out. Happy exploring!